
Getting dental implants changes your smile, but the recovery process raises a lot of questions. You might wonder how much pain to expect, when you can eat normal foods again, or how long until everything feels back to normal.
Most people experience initial healing within the first two weeks, but complete bone fusion takes three to six months before your permanent tooth can be placed.
The good news is that you won’t feel like you’re recovering for most of that time. After the first couple of weeks, you can return to your regular activities while your implant quietly integrates with your jawbone.
Understanding the dental implant recovery timeline helps you plan ahead and know what’s normal at each stage.
This guide walks you through what happens during each stage of recovery. You’ll learn what to expect during the first 24 hours, how to manage swelling during week one, when you can expand your diet, and what signs mean you should call your dentist.
Key Takeaways
- The first two weeks involve managing swelling and eating soft foods, but most visible healing is complete by week two
- Your implant fuses to your jawbone over three to six months through osseointegration, though you’ll feel normal after a few weeks
- Good oral hygiene and following your dentist’s instructions throughout recovery help ensure your implant lasts for years
Understanding Implant Surgery and Initial Recovery
The implant procedure involves placing a titanium post into your jawbone, and knowing what happens during and right after surgery helps you prepare for the first few days of healing. Your body responds to this surgical process in predictable ways, from swelling to discomfort.
What Happens During Implant Placement
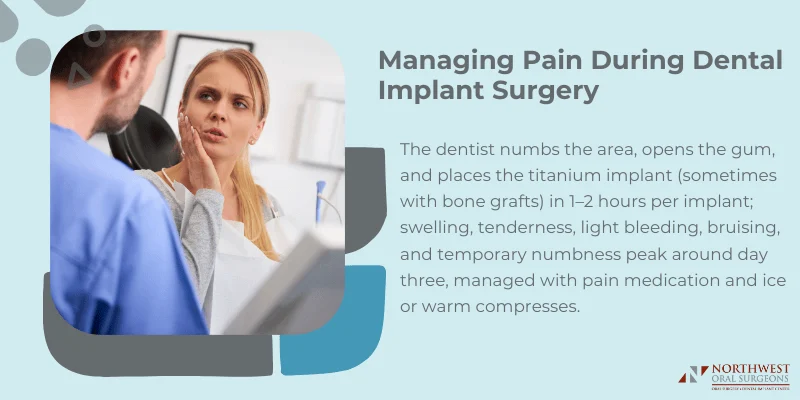
Your dentist starts by numbing the area with local anesthesia. Once you’re comfortable, they make a small opening in your gum tissue to access the jawbone underneath. The titanium implant gets carefully positioned into the bone at a precise depth and angle.
This titanium post acts as an artificial tooth root. The metal is biocompatible, which means your body won’t reject it. After the implant is secured in place, your dentist may close the gum tissue over it with stitches or leave it exposed, depending on your treatment plan.
The whole process usually takes 1 to 2 hours per implant. If you need multiple dental implants, the surgery takes longer. Some patients also need bone grafting during the same appointment, which adds time and affects your recovery timeline.
Immediate Post-Surgery Effects
Your face might look puffy for the first few days after getting dental implants. Some bleeding is normal, and you’ll probably see light oozing for a few hours. Bite down gently on gauze packs for 30 to 45 minutes at a time.
Bruising can appear around the surgical site. Your gums will feel tender. These effects are your body’s natural response to the procedure and don’t mean something is wrong.
Most people experience peak swelling on day three. You might also notice some numbness that should fade within 24 hours as the anesthesia wears off completely.
Importance of Pain Management
Taking your pain medication before the numbing wears off makes a big difference in your comfort level. Set a timer so you don’t forget your next dose. Many patients find that staying ahead of the pain works better than trying to catch up after it starts.
Ice packs help control both pain and swelling during the first 24 hours after implant placement. Apply them for 20 minutes on, then 20 minutes off. After the first day or two, warm compresses often provide more relief than ice.
Your dentist will prescribe medication based on your specific needs. Over-the-counter options like ibuprofen work well for mild discomfort, while prescription pain relievers help with more significant pain after implant surgery.
Week 1: Immediate Healing and Care
The first seven days focus on controlling swelling, managing pain, and protecting the surgical site while your body begins the healing process. You’ll need to adjust your diet and cleaning routine to give your implant the best chance to heal properly.
Soft Food Diet and Oral Hygiene Habits

Your mouth needs time to heal, so stick to foods that don’t require much chewing. Scrambled eggs, mashed potatoes, oatmeal, protein shakes, and pasta work well during this period. Keep everything at room temperature, as hot foods can irritate the surgical site.
Avoid crunchy, chewy, or hard foods that could disturb the implant. This means no chips, nuts, raw vegetables, or tough meats for now. Smoothies are great, but skip using a straw. The suction can dislodge the blood clot that’s forming around your implant.
Brush your other teeth normally, but avoid the surgical area. Use a soft-bristled toothbrush to maintain oral hygiene without causing irritation. Good oral hygiene helps prevent infection during dental implant healing, but you need to be gentle around the implant site.
Managing Swelling and Discomfort
Swelling usually peaks around day three, and your face might look puffy or bruised. This is normal and doesn’t mean something went wrong. Apply ice packs for 20 minutes on, then 20 minutes off, during the first 48 hours to reduce swelling.
Take your pain medication before the numbing wears off after surgery. Set a timer to avoid missing doses during the immediate post-surgery hours. Most people find that discomfort decreases significantly by days 5-7.
Some light bleeding or oozing is expected for the first few hours. Bite down gently on gauze packs for 30 to 45 minutes at a time. Rest as much as possible since your body needs energy for healing, not physical activity.
Using Salt Water Rinses Safely
Start salt water rinses on day two, not immediately after surgery. Mix half a teaspoon of salt in a cup of warm water. The water should be comfortably warm, not hot.
Swish the rinse gently around your mouth after meals and before bed. Don’t swish vigorously or spit forcefully. Let the water fall out of your mouth instead of spitting hard, which can disturb the healing tissue.
These rinses keep the area clean and help prevent infection during the crucial first week. Do this 3-4 times per day, especially after eating, to remove food particles without touching the surgical site directly.
Have questions about healing after implants? Talk with a specialist and get a recovery plan made just for you.
Weeks 2–4: Early Implant Healing and Follow-Up
Your mouth makes significant progress during weeks 2–4 as the gum tissue heals and your dentist checks that everything is developing correctly. The surgical site should look much better, and you can start eating more normal foods.
Reduction in Swelling and Suture Care
Most swelling disappears by week 2. Your gums should change from red to a healthier pink color as inflammation around your implant subsides.
If your dentist used dissolvable stitches, they typically fall out on their own during this period. Regular stitches need removal at a follow-up appointment. Don’t try to remove them yourself.
The healing abutment (the cap that sits above your implant) becomes visible as your gums heal around it. The tissue should fit snugly around this metal piece. Any bruising from surgery fades completely by week 3.
You can return to most normal daily activities during this time. Avoid intense exercise that raises your blood pressure until your dentist gives you the okay.
Transitioning Your Diet
You can gradually add more variety to your meals between weeks 2–4. Start with soft warm foods like scrambled eggs, pasta, and cooked vegetables.
Continue avoiding hard, crunchy, or sticky foods that could damage the surgical site. Chew on the opposite side of your mouth from the implant. Foods like raw carrots, nuts, hard bread, and tough meats should wait until later in dental implant recovery time.
Your body needs extra nutrients during implant healing. Focus on protein-rich foods like fish, eggs, and yogurt. Add foods with vitamin C and calcium to support tissue repair and bone growth.
First Follow-Up Appointment
Your dentist schedules follow-up appointments to monitor your progress. The first visit typically happens 1–2 weeks after surgery.
During this appointment, your dentist will:
- Check the gum tissue around your implant
- Remove non-dissolving stitches if needed
- Clean the surgical area
- Look for any signs of infection
- Make sure the healing abutment remains properly positioned
Your dentist may take X-rays to confirm the implant stayed in the correct position. They’ll also give you instructions for the next phase of healing. Tell your dentist about any pain, unusual discharge, or concerns you have.
Weeks 5–12: Osseointegration and Recovering Daily Life
During weeks 5 through 12, your jaw bone actively fuses with the titanium implant while you return to your normal routine. This period marks a critical phase where proper care and patience determine long-term success.
The Osseointegration Process
The osseointegration process is when your bone grows directly onto the implant surface, creating a permanent bond. Your body treats the titanium post as part of your natural bone structure. This fusion typically takes 3 to 6 months to complete.
During this time, you won’t feel much happening. Most patients experience no pain or discomfort. The implant should feel stable and secure in your jaw.
Your bone cells multiply and attach to the implant’s surface at a microscopic level. This creates a connection stronger than your original tooth root. You can eat most foods normally, but avoid chewing hard items directly on the implant site.
Key signs of successful osseointegration:
- No pain or tenderness around the implant
- The implant doesn’t move or wiggle
- No swelling or redness in the gums
- You can bite down without discomfort
Bone Grafting and Potential Delays
If you received bone grafting during your surgery, your implant recovery timeline extends by 3 to 6 months. The grafted bone needs time to integrate before the implant can fully fuse.
Bone grafting adds an extra healing stage to your recovery. Your body must first accept the graft material and grow new bone cells around it. Only then can osseointegration begin.
Several factors can slow down bone integration. Smoking reduces blood flow and oxygen to the healing site. Diabetes affects your body’s ability to heal properly. Poor nutrition deprives your body of essential vitamins and minerals needed for bone growth.
Implant failure occurs in less than 5% of cases, usually due to infection or inadequate bone density. Contact your dentist immediately if you notice persistent pain, swelling, or mobility in the implant.
Maintaining Oral Hygiene Routines
You need to keep the implant area clean without disturbing the healing process. Brush twice daily with a soft-bristled toothbrush, being gentle around the implant site.
Use an antibacterial mouthwash to reduce bacteria buildup. Rinse after meals to remove food particles. Avoid alcohol-based rinses that can dry out your mouth and irritate tissues.
Floss carefully around the implant using waxed floss or a water flosser. Don’t force the floss down into the gum line. Clean between all your teeth to prevent infection from spreading.
Daily care checklist:
- Brush gently twice per day
- Rinse with antibacterial mouthwash
- Floss around the implant carefully
- Avoid sticky or hard foods on the implant side
- Attend all follow-up appointments
Your dentist will monitor your progress during regular check-ups. These visits ensure the osseointegration is progressing as expected and catch any issues early.
Don’t guess about recovery. Schedule your dental implant consultation in Munster or Schererville, IN and get a personalized recovery timeline from our surgical team.
Months 3–6: Final Stages and Permanent Restoration
After your implant fuses with your jawbone, you’re ready for the visible parts of your new tooth. This phase involves checking your healing progress, attaching connector pieces, and placing your custom-made crown.
Assessment for Final Restoration
Your dentist will examine the implant site to confirm that osseointegration is complete. This usually happens around the three to six month mark. They’ll take X-rays to verify that your jawbone has properly fused with the titanium post.
During this visit, your dentist checks the health of your gum tissue around the implant. They look for signs of proper healing and make sure there’s no infection or inflammation. If everything looks good, you can move forward with the final restoration.
Your dentist may also assess your bite and jaw alignment at this appointment. They want to ensure your new tooth will fit properly with your other teeth. This careful evaluation helps prevent problems down the road.
Placing the Abutment and Crown
The abutment is a small connector piece that attaches to your implant post. Your dentist will either expose the implant through a minor procedure or simply attach the abutment if a healing abutment was already in place. The gum tissue needs about two weeks to heal around this connector.
Once your gums heal, your dentist takes impressions of your mouth. A dental lab uses these impressions to create your custom crown. The lab technician carefully matches the color, shape, and size to your natural teeth.
When your crown is ready, you return for the final prosthetic restoration. Your dentist places it on the abutment and checks the fit. They make adjustments to ensure your bite feels natural and comfortable before permanently securing the crown.
Temporary Teeth vs. Permanent Restoration
Some patients receive temporary teeth during their dental implant recovery to fill gaps while waiting for osseointegration. These temporary options help you eat and smile normally during the healing months. They’re designed to look natural but aren’t meant to last long-term.
Temporary teeth options:
- Removable partial dentures
- Temporary crowns on neighboring teeth
- Immediate load temporaries (in select cases)
Your permanent restoration is much stronger and more durable than any temporary solution. It’s made from high-quality materials like porcelain or ceramic that resist staining and wear. With proper care, your implant can last 20+ years or even a lifetime.
The permanent crown looks and functions exactly like a natural tooth. You can eat all your favorite foods without restrictions once it’s in place.
Long-Term Implant Health and Maintenance
Your implant needs consistent care to stay healthy for decades. Proper daily cleaning with specialized tools and regular monitoring can prevent infections that threaten your implant’s stability.
Daily Cleaning with Interdental Brushes
Interdental brushes are small cone-shaped brushes that clean the tight spaces around your implant where regular toothbrushes can’t reach. You should use these brushes at least once per day to remove plaque and food particles from around the abutment and crown.
Insert the brush gently between your implant and adjacent teeth using a back-and-forth motion. Don’t force the brush or use one that’s too large for the space. The brush should slide in comfortably without causing pain or bleeding.
Replace your interdental brush every 1-2 weeks or when the bristles show wear. Using worn brushes won’t clean effectively and may harbor bacteria.
Key areas to clean with interdental brushes:
- Between the implant crown and natural teeth
- Around the base where the crown meets the gum line
- The backside of the implant that your toothbrush misses
Benefits of Water Flosser Use
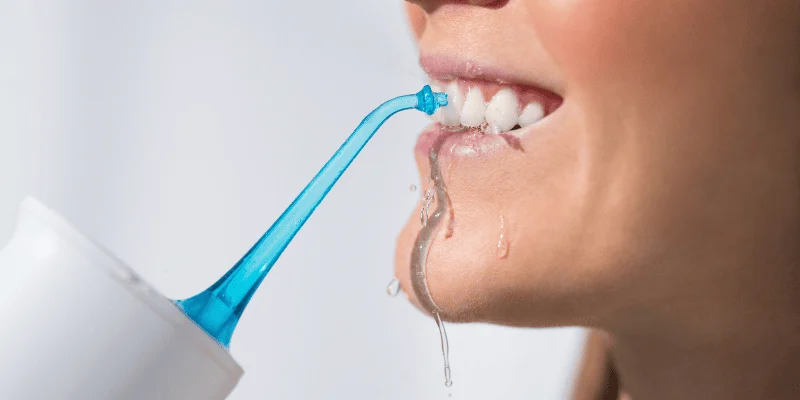
A water flosser shoots a targeted stream of water to flush out bacteria and debris from around your implant. This tool reaches areas that string floss and brushes often miss, making it especially useful for maintaining dental implant health.
Set your water flosser to medium pressure and aim the tip at a 90-degree angle to your gum line. Trace along the gum tissue around your implant, pausing briefly between teeth. The pulsating water disrupts bacterial colonies before they form hard deposits.
Use your water flosser once daily, preferably before bedtime. Many people find it easier and more comfortable than traditional floss, which can be difficult to maneuver around implants. The water also stimulates blood flow to your gums, promoting healthier tissue around the implant site.
Preventing Peri-Implantitis and Implant Failure
Peri-implantitis is a bacterial infection that destroys the bone supporting your implant. This condition causes gum inflammation, bleeding, bone loss, and eventually implant failure if left untreated.
Warning signs include swelling or redness around the implant, bleeding when you brush or floss, pus discharge, or the implant feeling loose. Contact your dentist immediately if you notice any of these symptoms.
Risk factors for peri-implantitis:
- Poor oral hygiene and plaque buildup
- Smoking or tobacco use
- Diabetes or other systemic conditions
- History of gum disease
- Infrequent dental check-ups
Schedule professional cleanings every 3-6 months so your dentist can monitor bone levels around your implant with X-rays. Your hygienist will use special instruments that won’t scratch the implant surface during cleanings. Proper care helps dental implants last a lifetime, but neglect can lead to failure within just a few years.
Ready to restore your smile? Schedule your dental implant visit and get clear expectations for every stage of healing.
Frequently Asked Questions
Recovery after implant surgery involves manageable discomfort in the first days, gradual healing over several weeks, and a return to most normal activities by the sixth week. Most patients initially experience swelling and soreness, followed by gradual improvement as the body heals around the implant.
What can I expect during the first week of recovery following implant surgery?
The first week after dental implant surgery brings some swelling, minor bruising, and discomfort. These are normal parts of healing.
You should apply ice packs to the area for 10-20 minute intervals to manage swelling. Your dentist will prescribe or recommend pain medication to keep you comfortable.
Rest is important during the first 24-48 hours. You need to avoid strenuous activity so your body can focus on healing.
Your diet will be limited to soft foods and liquids. Think smoothies, yogurt, mashed potatoes, and lukewarm soups.
You must avoid hard, crunchy, or chewy foods that could irritate the surgical site. Gentle oral hygiene is vital; you should rinse your mouth with a prescribed solution or saltwater.
How does the healing process evolve in the second week after getting implants?
By the second week, most of the initial discomfort and swelling will have gone down. You’ll likely feel much more like yourself.
You may return for a follow-up appointment, during which your dentist assesses your healing progress. If you have sutures, they may be removed at this visit.
You can slowly add slightly firmer foods to your diet as your comfort level allows. However, you should still avoid chewing directly on the implant site.
Are there any specific milestones I should be aware of in the third week of post-implant surgery recovery?
During the third week, your jawbone begins the process of osseointegration. This means the bone starts growing around and fusing with the titanium implant.
You probably won’t feel much happening day-to-day during this phase. Your body is working behind the scenes to create a strong foundation.
Most patients experience very little to no discomfort during this healing period. You can usually carry on with daily activities without interruption.
Continue maintaining excellent oral hygiene while being gentle around the implant area. You can typically resume regular brushing and flossing on your other teeth.
What activities should I be cautious of or avoid in the fourth week after my surgery?
By the fourth week, you’re still in the osseointegration phase. Your bone continues to fuse with the implant post.
You should still avoid chewing directly on the implant site until it’s fully integrated. This protects the developing bond between bone and implant.
Strenuous physical activities are generally okay at this point. However, you should check with your dentist about any specific restrictions based on your individual case.
Continue eating a balanced diet that supports healing. You can gradually reintroduce more solid foods as long as they don’t put direct pressure on the implant.
Could you describe the noticeable changes in my recovery during the fifth week post-surgery?
During the fifth week, the osseointegration process is well underway. The implant becomes increasingly stable as your bone continues to grow around it.
You’ll likely feel completely back to normal in terms of discomfort. Any residual soreness or sensitivity should be gone by this point.
Your diet can expand further as the surgical site continues to strengthen. Just continue being mindful about not putting excessive force on the implant area.
You may have a check-up appointment where your dentist monitors the integration process. X-rays can help confirm that everything is progressing as it should.
By the sixth week of recovery, what level of normal activity should I anticipate resuming?
By the sixth week, you can resume nearly all normal activities. Initial soft-tissue healing is typically complete within approximately 2 weeks.
You’re still waiting for complete osseointegration, which takes 3-6 months total. During this time, your implant continues to strengthen even though you feel fine.
You can eat most foods comfortably, though you should still be cautious with very hard or sticky items. Your oral hygiene routine should be fully back to normal.
Regular dental check-ups help ensure your implant is integrating properly. These appointments set you up for the next phase when your permanent crown will be placed.